
One of Melanie Jarocki's favorite ways to showcase SRM Stickers on a project is with a banner -- they add a fun, dimensional touch, and are simple to make!
Supplies: SRM Happy Birthday stickers, 3 sheets of patterned paper, white cardstock and epoxy stickers.

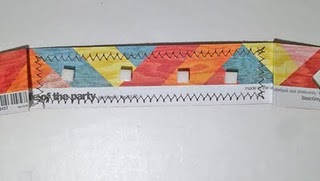
Place the sentiment sticker on white or light cardstock. Trim around sticker edges. Cut dark patterned paper to mat sentiment on. Cut a strip of patterned paper 1/2" wider than mat, and 4 inches longer.

Score the larger strip 1-3/4" inches in from each end and fold back.

After folding ends back, reverse fold them forward starting 1/8" from top and angle the fold so the bottom edge is about 1/4" from the first fold. Put ends together and trim out a "V" for the banner edges.

Place glue dots on the bottom of the folds and 1/8" dimensional squares on the main banner section.
Add the banner to your project. Be sure to place the dimensional adhesives on first, and the tuck the folded edges under to really make the banner pop.

Banners are great for cards, layouts, and gift bags... Have fun!

4 comments:
Great tutorial, thanks!!!
Very cute card!
Looks awesome. I love the way the banner is 3 dimensional.
Love that banner, looks fantastic on that wonderful card!
Post a Comment